Introduction
mux (Coding Agent Multiplexer) is a cross-platform desktop application for AI-assisted development with isolated workspace management.
What is mux?
mux helps you work with multiple coding assistants more effectively via:
- Isolated workspaces with central view on git status updates
- Multi-model (
sonnet-4-*,grok-*,gpt-5-*,opus-4-*) support - Supporting UI and keybinds for efficiently managing a suite of agents
- Rich markdown outputs (mermaid diagrams, LaTeX, etc.)
Quick Links
- Install - Download and installation instructions
- Why Parallelize? - Why parallelize?
- Keyboard Shortcuts - Complete keyboard reference
- AGENTS - Developer guide for AI assistants
License
mux is licensed under the GNU Affero General Public License v3.0 (AGPL-3.0).
Copyright (C) 2025 Coder Technologies, Inc.
Install
Downloads
Release Builds
Download pre-built binaries from the releases page:
- macOS: Signed and notarized DMG (separate builds for Intel/Apple Silicon)
- Linux: AppImage
Development Builds
Down pre-built binaries of main from GitHub Actions:
- macOS: Signed and notarized DMG
macos-dmg-x64(Intel Macs)macos-dmg-arm64(Apple Silicon)
- Linux: AppImage (portable, works on most distros)
To download:
- Go to the Build workflow
- Click on the latest successful run
- Scroll down to "Artifacts" section
- Download the appropriate artifact for your platform
Installation
macOS:
- Download the DMG file for your Mac:
- Intel Mac:
macos-dmg-x64 - Apple Silicon:
macos-dmg-arm64
- Intel Mac:
- Open the DMG file
- Drag Mux to Applications folder
- Open the app normally
The app is code-signed and notarized by Apple, so it will open without security warnings.
Linux:
- Download the AppImage file
- Make it executable:
chmod +x Mux-*.AppImage - Run it:
./Mux-*.AppImage
Testing Pre-Release Builds
⚠️ Note: Only builds from the main branch are signed and notarized. If you're testing a build from a pull request or other branch, you'll need to bypass macOS Gatekeeper:
- After installing, open Terminal
- Run:
xattr -cr /Applications/Mux.app - Run:
codesign --force --deep --sign - /Applications/Mux.app - Now you can open the app normally
Why Parallelize?
Here are some specific use cases we enable:
- Contextual continuity between relevant changes:
- e.g. create a workspace for
code-review,refactor, andnew-feature
- e.g. create a workspace for
- GPT-5-Pro: use the slow but powerful GPT-5-Pro for complex issues
- Run in the background for hours on end
- The stream will automatically resume after restarts or intermittent connection issues. We show a subtle indicator when the model completes.
- A/B testing: test a variety of approaches to the same problem, abandon the bad ones.
- Tangent management: launch tangents in
muxaway from main work
Workspaces
Workspaces in mux provide isolated development environments for parallel agent work. Each workspace maintains its own Git state, allowing you to explore different approaches, run multiple tasks simultaneously, or test changes without affecting your main repository.
Workspace Types
mux supports two workspace backends:
-
Local Workspaces: Use git worktrees on your local machine. Worktrees share the
.gitdirectory with your main repository while maintaining independent working changes. -
SSH Workspaces: Regular git clones on a remote server accessed via SSH. These are completely independent repositories stored on the remote machine.
Choosing a Backend
The workspace backend is selected when you create a workspace:
- Local: Best for fast iteration, local testing, and when you want to leverage your local machine's resources
- SSH: Ideal for heavy workloads, long-running tasks, or when you need access to remote infrastructure
Key Concepts
- Isolation: Each workspace has independent working changes and Git state
- Branch flexibility: Workspaces can switch branches, enter detached HEAD state, or create new branches as needed
- Parallel execution: Run multiple workspaces simultaneously on different tasks
- Shared commits: Local workspaces (using worktrees) share commits with the main repository immediately
Reviewing Code
Here are a few practical approaches to reviewing changes from workspaces, depending on how much you want your agent to interact with git:
- Agent codes, commits, and pushes: Ask agent to submit a PR and review changes in your git Web UI (GitHub, GitLab, etc.)
- Also see: Agentic Git Identity
- This is the preferred approach for
muxdevelopment but requires additional care with repository security.
- Agent codes and commits: Review changes from the main repository via
git diff <workspace-branch>, push changes when deemed acceptable. - Agent codes: Enter worktree (click Terminal icon in workspace top bar), run
git add -pand progressively accept changes into a commit.
Reviewing Functionality
Some changes (especially UI ones) require the Human to determine acceptability. An effective approach for this is:
- Ask agent to commit WIP when it's ready for Human review
- Human, in main repository, checks out the workspace branch in a detached HEAD state:
git checkout --detach <workspace-branch>(for local workspaces)
Note: For local workspaces, this workflow uses the detached HEAD state because the branch is already checked out in the workspace and you cannot check out the same branch multiple times across worktrees.
If you want faster iteration in between commits, you can hop into the workspace directory and run a dev server (e.g. bun dev) there directly and observe the agent's work in real-time.
See the specific workspace type pages for detailed setup and usage instructions.
Local Workspaces
Local workspaces use git worktrees on your local machine. Worktrees share the .git directory with your main repository while maintaining independent working changes and checkout state.
How Worktrees Work
A worktree is a separate directory on the same filesystem as the main repository that shares a .git but has independent working changes and checkout state. All committed changes from any worktree are visible to all other worktrees including the main repository.
It's important to note that a worktree is not locked to a branch. The agent can switch to new branches, enter a detached HEAD state, etc. When you create a workspace, the agent will begin at the selected branch but may switch freely in the course of the session. We empower users to define their agent's branching strategy in AGENTS.md
Filesystem Layout
Local workspaces are stored in ~/.mux/src/<project-name>/<workspace-name>.
Example layout:
~/.mux/src/
  mux-main/
    improved-auth-ux/
    fix-ci-flakes/
SSH Workspaces
mux supports using remote hosts over SSH for workspaces. When configured, all tool operations will execute over SSH and the agent is securely isolated from your local machine.
Our security architecture considers the remote machine potentially hostile. No keys or credentials are implicitly transferred there—just the git archive and Project Secrets.
We highly recommend using SSH workspaces for an optimal experience:
- Security: Prompt injection risk is contained to the credentials / files on the remote machine.
- SSH remotes pair nicely with agentic git identities
- Performance: Run many, many agents in parallel while maintaining good battery life and UI performance
The Host can be:
- a hostname (e.g.
my-server.com) - a username and hostname (e.g.
user@my-server.com) - an alias from your
~/.ssh/config, e.g.my-server - anything that passes through
ssh <host>can be used as a host
We delegate SSH configuration to the system's ssh command, so you can set up advanced
configuration for your agent host in your local ~/.ssh/config file.
Here's an example of a config entry:
Host ovh-1
	HostName 148.113.1.1
	User root
Authentication
Note: As we delegate to
ssh, this is really an abbreviated reference of howsshauthenticates.
There are a few practical ways to set up authentication.
Local default keys
ssh will check these locations by default:
~/.ssh/id_rsa
~/.ssh/id_ecdsa
~/.ssh/id_ecdsa_sk
~/.ssh/id_ed25519
~/.ssh/id_ed25519_sk
SSH Agent
If you have an SSH agent running, you can add your key:
ssh-add ~/.ssh/my_key_ecdsa
and ssh will use it to authenticate.
Config
You can also configure authentication in your ~/.ssh/config file.
Host my-server
	HostName 148.113.1.1
	User root
	IdentityFile ~/.ssh/id_rsa
Coder Workspaces
If you're using Coder Workspaces, you can use an existing Workspace as a mux agent host:
- Run
coder config-ssh - Use
coder.<workspace-name>as your SSH host when creating a new mux workspace
Note that in this approach we're multiplexing mux workspaces onto a single Coder workspace. This avoids the compute provisioning overhead to enable rapid creation and deletion of workspaces.
Forking Workspaces
Use /fork to clone a workspace with its full conversation history and UI state. The forked workspace gets a new workspace on a new branch (using the same backend as the current workspace).
Usage:
/fork <new-workspace-name>

[start-message (optional)]
Use cases
- Explore alternatives: Fork mid-conversation to try a different implementation approach.
- Isolate tangents: See an unrelated bug or opportunity in the course of a change? Fork to keep the main conversation on track.
- Create backup: Fork to keep a copy of an old conversation before a risky change in direction.
What happens when you fork
The new workspace:
- Appears at the top of the workspace list (most recent)
- Gets a unique auto-generated name (customize via rename after creation)
- Branches from the current workspace's HEAD commit
What's copied: Conversation history, model selection, thinking level, auto-retry setting, UI mode (plan/exec), chat input text
What's not copied: Uncommitted file changes (new branch starts from HEAD)
Init Hooks
Add a .mux/init executable script to your project root to run commands when creating new workspaces.
Example
#!/usr/bin/env bash
set -e

bun install
bun run build
Make it executable:
chmod +x .mux/init
Behavior
- Runs once per workspace on creation
- Streams output to the workspace UI in real-time
- Non-blocking - workspace is immediately usable, even while hook runs
- Exit codes preserved - failures are logged but don't prevent workspace usage
The init script runs in the workspace directory with the workspace's environment.
Environment Variables
Init hooks receive the following environment variables:
MUX_PROJECT_PATH- Absolute path to the project root on the local machine- Always refers to your local project path, even on SSH workspaces
- Useful for logging, debugging, or runtime-specific logic
MUX_RUNTIME- Runtime type:"local"or"ssh"- Use this to detect whether the hook is running locally or remotely
Note for SSH workspaces: Since the project is synced to the remote machine, files exist in both locations. The init hook runs in the workspace directory ($PWD), so use relative paths to reference project files:
#!/usr/bin/env bash
set -e

echo "Runtime: $MUX_RUNTIME"
echo "Local project path: $MUX_PROJECT_PATH"
echo "Workspace directory: $PWD"

# Copy .env from project root (works for both local and SSH)
# The hook runs with cwd = workspace, and project root is the parent directory
if [ -f "../.env" ]; then
  cp "../.env" "$PWD/.env"
fi

# Runtime-specific behavior
if [ "$MUX_RUNTIME" = "local" ]; then
  echo "Running on local machine"
else
  echo "Running on SSH remote"
fi

bun install
Use Cases
- Install dependencies (
npm install,bun install, etc.) - Run build steps
- Generate code or configs
- Set up databases or services
- Warm caches
Output
Init output appears in a banner at the top of the workspace. Click to expand/collapse the log. The banner shows:
- Script path (
.mux/init) - Status (running, success, or exit code on failure)
- Full stdout/stderr output
Idempotency
The hook runs every time you create a workspace, even if you delete and recreate with the same name. Make your script idempotent if you're modifying shared state.
VS Code Extension
The mux VS Code extension allows you to easily pair with mux during development. Our extension works with VS Code and Cursor.
It's especially useful for completing the "last mile" of a task or establishing the initial architecture.
Overview
The extension has a small initial surface area: a command to open a workspace.
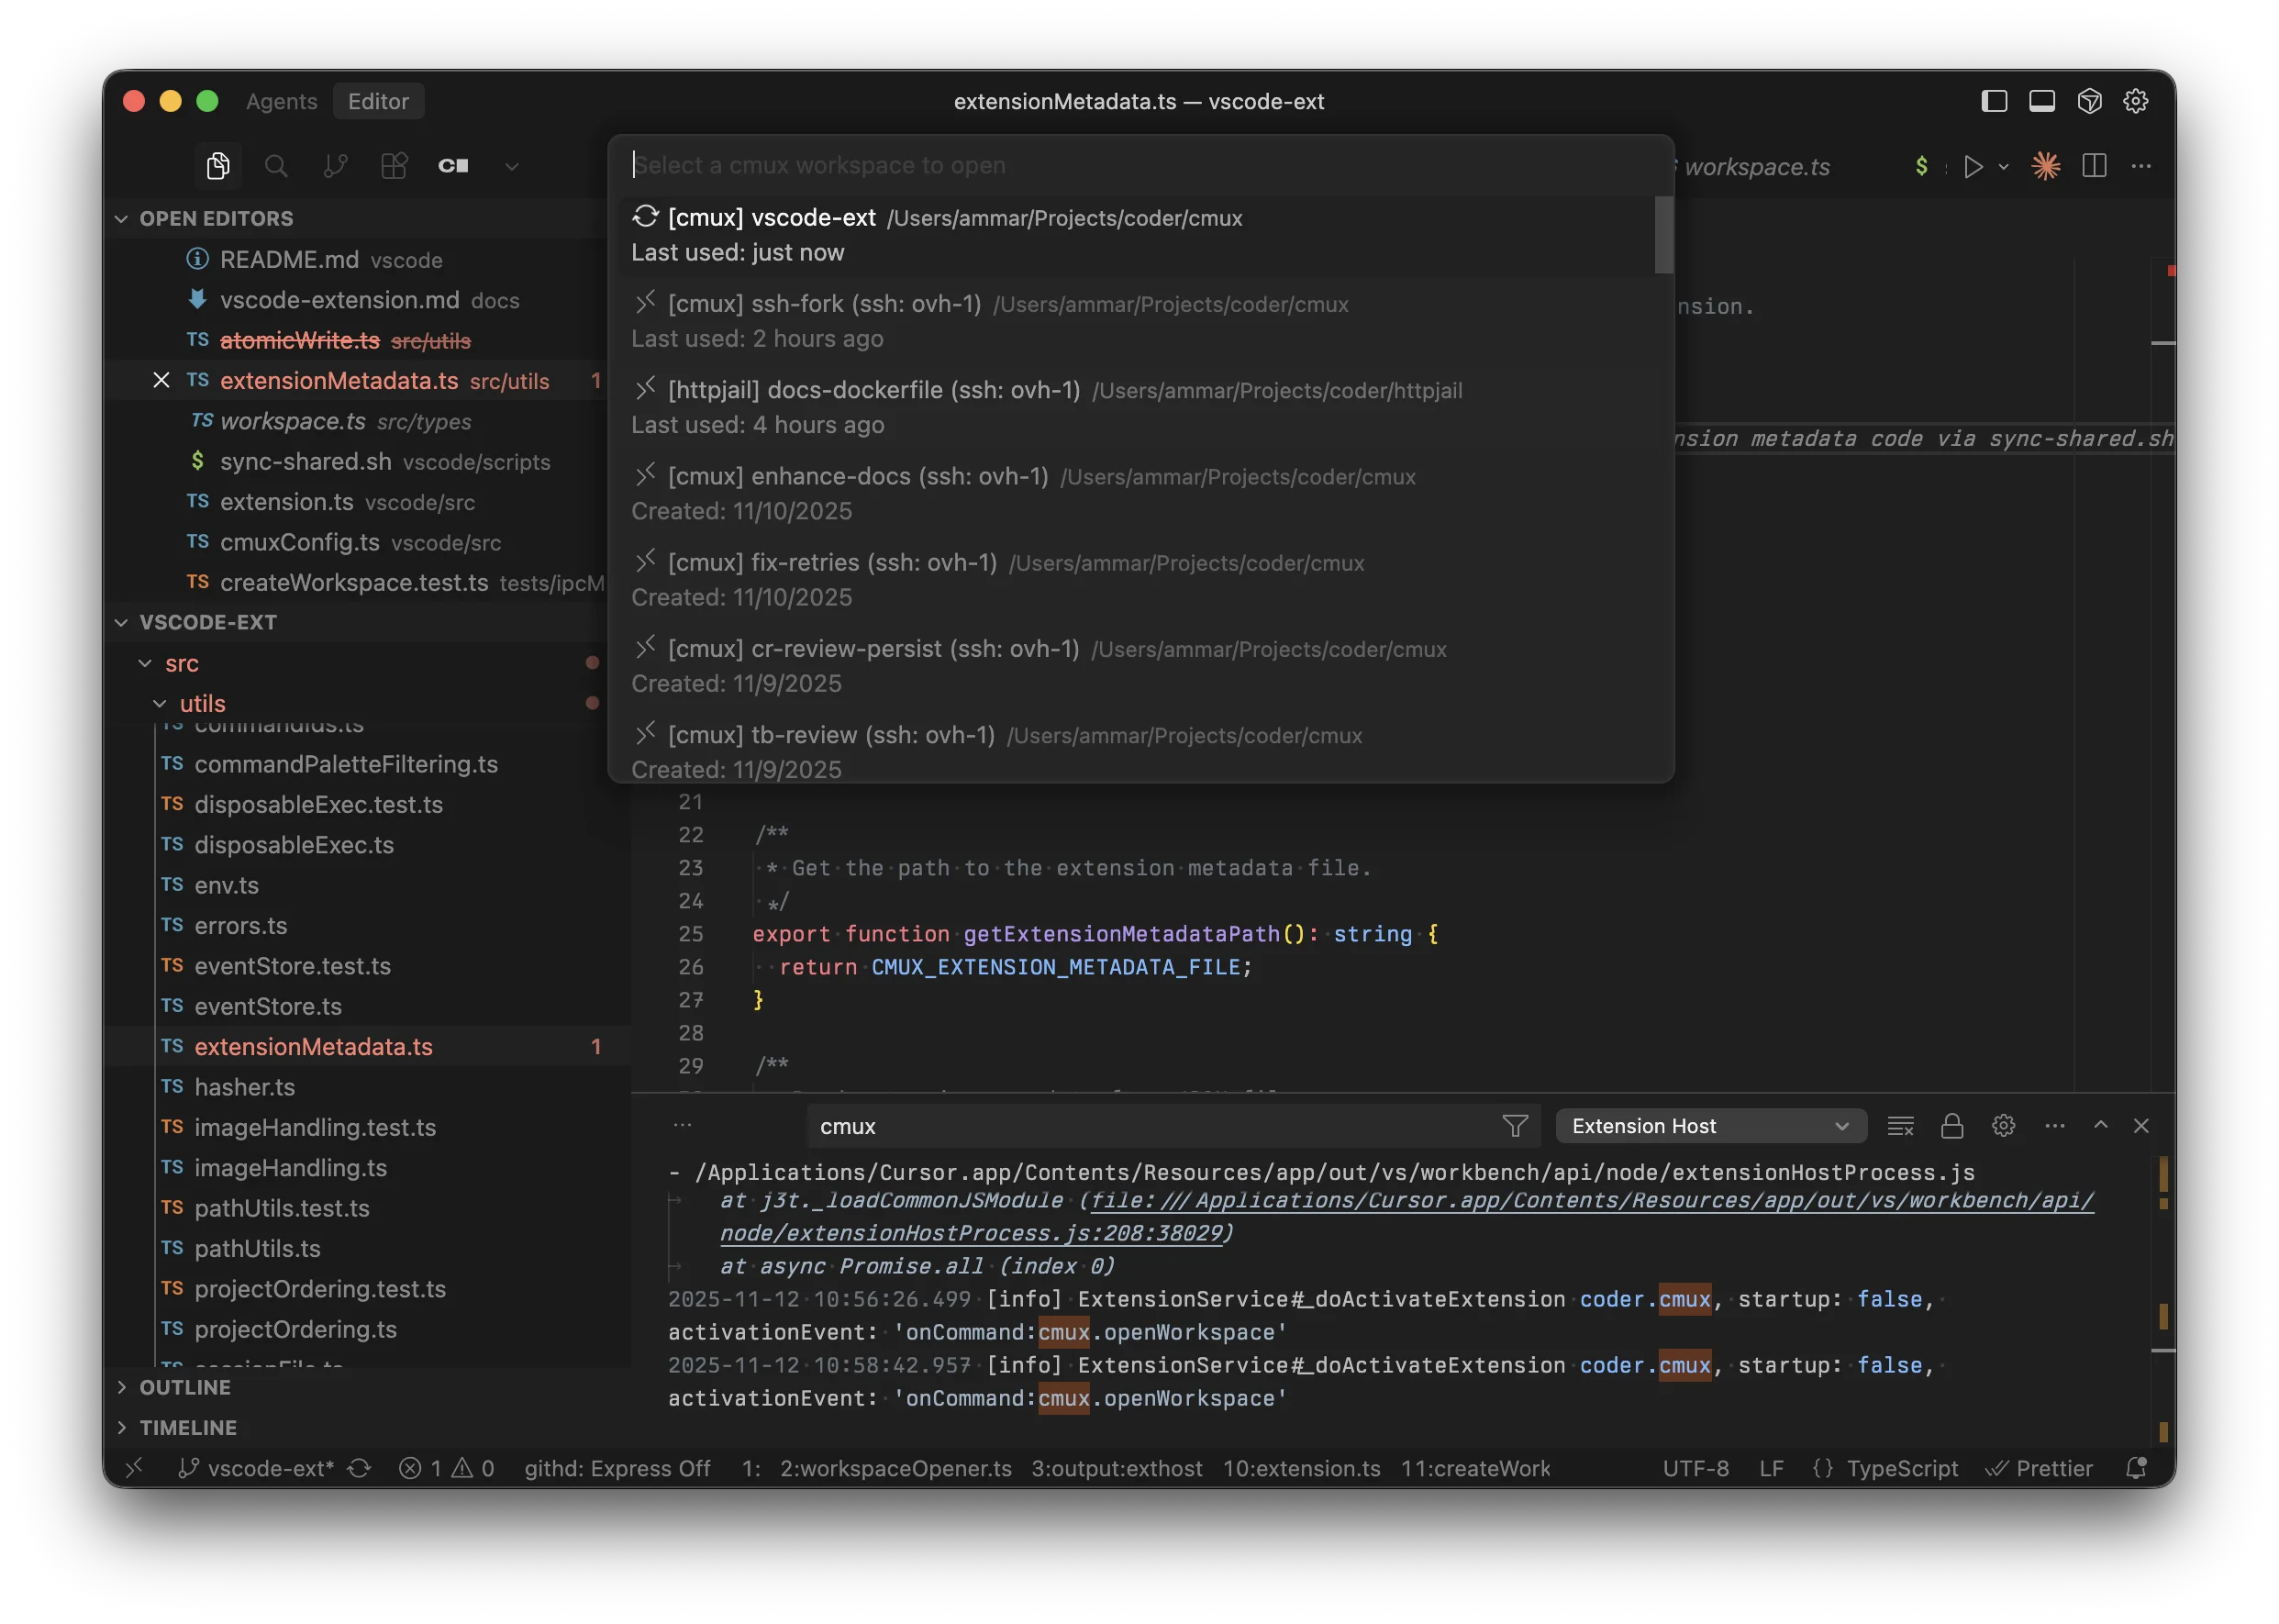
- Press
Cmd+Shift+P(orCtrl+Shift+Pon Windows/Linux) - Type "mux: Open Workspace"
- Optional: Set a custom keybinding in the Command Palette settings
- Select your workspace
- It opens in a new editor window
The extension works with both local and SSH workspaces.
Installation
Download
Download the latest .vsix file from the GitHub releases page.
Install
Command line:
# For VS Code
code --install-extension mux-*.vsix

# For Cursor
cursor --install-extension mux-*.vsix
From editor UI:
- Open Command Palette (
Cmd+Shift+P) - Type "Extensions: Install from VSIX..."
- Select the downloaded file
Workspace Types
The extension displays workspaces differently based on their type:
- Local:
📁 [project-name] workspace-name - SSH:
🔗 [project-name] workspace-name (ssh: hostname)
SSH Workspaces
Requirements
For SSH workspaces to work, you need:
- Remote-SSH Extension installed
- VS Code:
ms-vscode-remote.remote-ssh - Cursor:
anysphere.remote-ssh - The extension automatically detects which one you have
- VS Code:
- SSH host configured in
~/.ssh/configor in the Remote-SSH extension
Setup SSH Host
If you haven't configured the SSH host yet:
-
Open
~/.ssh/configand add:Host myserver HostName 192.168.1.100 User username IdentityFile ~/.ssh/id_rsa -
Or use VS Code's Remote-SSH command:
Cmd+Shift+P→ "Remote-SSH: Add New SSH Host..."
Development
For development instructions, see vscode/README.md and vscode/DEVELOPMENT.md in the
repository.
Related
Models
See also:
mux supports multiple AI providers through its flexible provider architecture.
Supported Providers
Anthropic (Cloud)
Best supported provider with full feature support:
anthropic:claude-sonnet-4-5anthropic:claude-opus-4-1
Setup:
Anthropic can be configured via ~/.mux/providers.jsonc or environment variables:
{
  "anthropic": {
    "apiKey": "sk-ant-...",
    // Optional: custom base URL (mux auto-appends /v1 if missing)
    "baseUrl": "https://api.anthropic.com",
  },
}
Or set environment variables:
ANTHROPIC_API_KEYorANTHROPIC_AUTH_TOKEN— API key (required if not in providers.jsonc)ANTHROPIC_BASE_URL— Custom base URL (optional)
Note: Environment variables are read automatically if no config is provided. The /v1 path suffix is normalized automatically—you can omit it from base URLs.
OpenAI (Cloud)
GPT-5 family of models:
openai:gpt-5openai:gpt-5-pro
Google (Cloud)
Access Gemini models directly via Google's generative AI API:
google:gemini-3-pro-previewgoogle:gemini-2.5-progoogle:gemini-2.5-flash
Setup:
- Get your API key from Google AI Studio
- Add to
~/.mux/providers.jsonc:
{
  "google": {
    "apiKey": "AIza...",
  },
}
openai:gpt-5-codex
Note: Anthropic models are better supported than GPT-5 class models due to an outstanding issue in the Vercel AI SDK.
TODO: add issue link here.
xAI (Grok)
Frontier reasoning models from xAI with built-in search orchestration:
xai:grok-4-1— Fast unified model (switches between reasoning/non-reasoning based on thinking toggle)xai:grok-code— Optimized for coding tasks
Setup:
- Create an API key at console.x.ai
- Add to
~/.mux/providers.jsonc:
{
  "xai": {
    "apiKey": "sk-xai-...",
  },
}
Search orchestration:
Mux enables Grok's live search by default using mode: "auto" with citations. Add searchParameters to providers.jsonc if you want to customize the defaults (e.g., regional focus, time filters, or disabling search entirely per workspace).
OpenRouter (Cloud)
Access 300+ models from multiple providers through a single API:
openrouter:z-ai/glm-4.6openrouter:anthropic/claude-3.5-sonnetopenrouter:google/gemini-2.0-flash-thinking-expopenrouter:deepseek/deepseek-chatopenrouter:openai/gpt-4o- Any model from OpenRouter Models
Setup:
- Get your API key from openrouter.ai
- Add to
~/.mux/providers.jsonc:
{
  "openrouter": {
    "apiKey": "sk-or-v1-...",
  },
}
Provider Routing (Advanced):
OpenRouter can route requests to specific infrastructure providers (Cerebras, Fireworks, Together, etc.). Configure provider preferences in ~/.mux/providers.jsonc:
{
  "openrouter": {
    "apiKey": "sk-or-v1-...",
    // Use Cerebras for ultra-fast inference
    "order": ["Cerebras", "Fireworks"], // Try in order
    "allow_fallbacks": true, // Allow other providers if unavailable
  },
}
Or require a specific provider (no fallbacks):
{
  "openrouter": {
    "apiKey": "sk-or-v1-...",
    "order": ["Cerebras"], // Only try Cerebras
    "allow_fallbacks": false, // Fail if Cerebras unavailable
  },
}
Provider Routing Options:
order: Array of provider names to try in priority order (e.g.,["Cerebras", "Fireworks"])allow_fallbacks: Boolean - whether to fall back to other providers (default:true)only: Array - restrict to only these providersignore: Array - exclude specific providersrequire_parameters: Boolean - only use providers supporting all your request parametersdata_collection:"allow"or"deny"- control whether providers can store/train on your data
See OpenRouter Provider Routing docs for details.
Reasoning Models:
OpenRouter supports reasoning models like Claude Sonnet Thinking. Use the thinking slider to control reasoning effort:
- Off: No extended reasoning
- Low: Quick reasoning for straightforward tasks
- Medium: Standard reasoning for moderate complexity (default)
- High: Deep reasoning for complex problems
The thinking level is passed to OpenRouter as reasoning.effort and works with any reasoning-capable model. See OpenRouter Reasoning docs for details.
Ollama (Local)
Run models locally with Ollama. No API key required:
ollama:gpt-oss:20bollama:gpt-oss:120bollama:qwen3-coder:30b- Any model from the Ollama Library
Setup:
- Install Ollama from ollama.com
- Pull a model:
ollama pull gpt-oss:20b - That's it! Ollama works out-of-the-box with no configuration needed.
Custom Configuration (optional):
By default, mux connects to Ollama at http://localhost:11434/api. To use a remote instance or custom port, add to ~/.mux/providers.jsonc:
{
  "ollama": {
    "baseUrl": "http://your-server:11434/api",
  },
}
Amazon Bedrock (Cloud)
Access Anthropic Claude and other models through AWS Bedrock:
bedrock:us.anthropic.claude-sonnet-4-20250514-v1:0bedrock:us.amazon.nova-pro-v1:0
Model IDs follow the Bedrock format: [region.]vendor.model-name-version. mux automatically parses these for display (e.g., us.anthropic.claude-sonnet-4-20250514-v1:0 displays as "Sonnet 4").
Authentication Options:
Bedrock supports multiple authentication methods, tried in order:
- Bearer Token (simplest) — A single API key for Bedrock access
- Explicit Credentials — Access Key ID + Secret Access Key in config
- AWS Credential Chain — Automatic credential resolution (recommended for AWS environments)
Option 1: Bearer Token
The simplest approach if you have a Bedrock API key:
{
  "bedrock": {
    "region": "us-east-1",
    "bearerToken": "your-bedrock-api-key",
  },
}
Or set via environment variable:
export AWS_REGION=us-east-1
export AWS_BEARER_TOKEN_BEDROCK=your-bedrock-api-key
Option 2: Explicit AWS Credentials
Use IAM access keys directly:
{
  "bedrock": {
    "region": "us-east-1",
    "accessKeyId": "AKIA...",
    "secretAccessKey": "...",
  },
}
Option 3: AWS Credential Chain (Recommended for AWS)
If no explicit credentials are provided, mux uses the AWS SDK's fromNodeProviderChain() which automatically resolves credentials from (in order):
- Environment variables —
AWS_ACCESS_KEY_ID,AWS_SECRET_ACCESS_KEY,AWS_SESSION_TOKEN - Shared credentials file —
~/.aws/credentials(supports profiles viaAWS_PROFILE) - SSO credentials — AWS IAM Identity Center (configure with
aws sso login) - EC2 instance profile — Automatic on EC2 instances with IAM roles
- ECS task role — Automatic in ECS containers
- EKS Pod Identity / IRSA — Automatic in Kubernetes with IAM Roles for Service Accounts
For region, mux checks AWS_REGION and AWS_DEFAULT_REGION environment variables, so standard AWS CLI configurations work automatically.
This means if you're already authenticated with AWS CLI (aws sso login or configured credentials), mux will automatically use those credentials:
{
  "bedrock": {
    "region": "us-east-1",
    // No credentials needed — uses AWS credential chain
  },
}
Required IAM Permissions:
Your AWS credentials need the bedrock:InvokeModel and bedrock:InvokeModelWithResponseStream permissions for the models you want to use.
Provider Configuration
All providers are configured in ~/.mux/providers.jsonc. Example configurations:
{
  // Anthropic: config OR env vars (ANTHROPIC_API_KEY, ANTHROPIC_BASE_URL)
  "anthropic": {
    "apiKey": "sk-ant-...",
  },
  // Required for OpenAI models
  "openai": {
    "apiKey": "sk-...",
  },
  // Required for Google models
  "google": {
    "apiKey": "AIza...",
  },
  // Required for Grok models
  "xai": {
    "apiKey": "sk-xai-...",
  },
  // Required for OpenRouter models
  "openrouter": {
    "apiKey": "sk-or-v1-...",
  },
  // Bedrock (uses AWS credential chain if no explicit credentials)
  "bedrock": {
    "region": "us-east-1",
  },
  // Optional for Ollama (only needed for custom URL)
  "ollama": {
    "baseUrl": "http://your-server:11434/api",
  },
}
Model Selection
The quickest way to switch models is with the keyboard shortcut:
- macOS:
Cmd+/ - Windows/Linux:
Ctrl+/
Alternatively, use the Command Palette (Cmd+Shift+P / Ctrl+Shift+P):
- Type "model"
- Select "Change Model"
- Choose from available models
Models are specified in the format: provider:model-name
Keyboard Shortcuts
mux is designed to be keyboard-driven for maximum efficiency. All major actions have keyboard shortcuts.
Note: This document should be kept in sync with
src/utils/ui/keybinds.ts, which is the source of truth for keybind definitions.
Platform Conventions
- macOS: Shortcuts use
⌘(Command) as the primary modifier - Linux/Windows: Shortcuts use
Ctrlas the primary modifier
When documentation shows Ctrl, it means:
⌘(Command) on macOSCtrlon Linux/Windows
General
| Action | Shortcut |
|---|---|
| Cancel / Close / Interrupt | Esc |
Chat & Messages
| Action | Shortcut |
|---|---|
| Focus chat input | a, i, or Ctrl+I |
| Send message | Enter |
| New line in message | Shift+Enter |
| Cancel editing message | Ctrl+Q |
| Jump to bottom of chat | Shift+G |
| Change model | Ctrl+/ |
| Toggle thinking level | Ctrl+Shift+T |
Workspaces
| Action | Shortcut |
|---|---|
| Create new workspace | Ctrl+N |
| Next workspace | Ctrl+J |
| Previous workspace | Ctrl+K |
| Open workspace in terminal | Ctrl+T |
Modes
| Action | Shortcut |
|---|---|
| Toggle between Plan and Exec modes | Ctrl+Shift+M |
Interface
| Action | Shortcut |
|---|---|
| Open command palette | Ctrl+Shift+P |
| Toggle sidebar | Ctrl+P |
Command Palette
The command palette (Ctrl+Shift+P) has two modes:
- Default (no prefix): Workspace switcher - shows only switching commands
>prefix: Command mode - shows all other commands (create/delete/rename workspaces, navigation, chat, modes, projects, etc.)/prefix: Slash commands - shows slash command suggestions for inserting into chat
This separation keeps the switcher clean and fast while making all other commands easily accessible via >.
Tips
- Vim-inspired navigation: We use
J/Kfor next/previous navigation, similar to Vim - VS Code conventions: Command palette is
Ctrl+Shift+Pand quick toggle isCtrl+P(use⌘on macOS) - Consistent modifiers: Most workspace/project operations use
Ctrlas the modifier - Natural expectations: We try to use shortcuts users would naturally expect (e.g.,
Ctrl+Nfor new) - Focus anywhere: Use
Ctrl+Ito quickly jump to the chat input from anywhere in the application - Per-model thinking:
Ctrl+Shift+Ttoggles thinking on/off and remembers your last preference for each model - Terminal access:
Ctrl+Topens the current workspace in your system terminal
Vim Mode
mux includes a built-in Vim mode for the chat input, providing familiar Vim-style editing for power users.
Enabling Vim Mode
Vim mode is always enabled. Press ESC to enter normal mode from insert mode.
Modes
Insert Mode (Default)
- This is the default mode when typing in the chat input
- Type normally, all characters are inserted
- Press ESC or Ctrl-[ to enter normal mode
Normal Mode
- Command mode for navigation and editing
- Indicated by "NORMAL" text above the input
- Pending commands are shown (e.g., "NORMAL d" when delete is pending)
- Press i, a, I, A, o, or O to return to insert mode
Navigation
Basic Movement
- h - Move left one character
- j - Move down one line
- k - Move up one line
- l - Move right one character
Word Movement
- w - Move forward to start of next word
- W - Move forward to start of next WORD (whitespace-separated)
- b - Move backward to start of previous word
- B - Move backward to start of previous WORD
- e - Move to end of current/next word
- E - Move to end of current/next WORD
Line Movement
- 0 - Move to beginning of line
- _ - Move to first non-whitespace character of line
- $ - Move to end of line
- Home - Same as 0
- End - Same as $
Column Preservation
When moving up/down with j/k, the cursor attempts to stay in the same column position. If a line is shorter, the cursor moves to the end of that line, but will return to the original column on longer lines.
Entering Insert Mode
- i - Insert at cursor
- a - Append after cursor
- I - Insert at beginning of line
- A - Append at end of line
- o - Open new line below and insert
- O - Open new line above and insert
Editing Commands
Simple Edits
- x - Delete character under cursor
- p - Paste after cursor
- P - Paste before cursor
Undo/Redo
- u - Undo last change
- Ctrl-r - Redo
Line Operations
- dd - Delete line (yank to clipboard)
- yy - Yank (copy) line
- cc - Change line (delete and enter insert mode)
Operators + Motions
Vim's power comes from combining operators with motions. All operators work with all motions:
Operators
- d - Delete
- c - Change (delete and enter insert mode)
- y - Yank (copy)
Motions
- w - To next word
- b - To previous word
- e - To end of word
- $ - To end of line
- 0 - To beginning of line
- _ - To first non-whitespace character
Examples
- dw - Delete to next word
- de - Delete to end of word
- d$ - Delete to end of line
- cw - Change to next word
- ce - Change to end of word
- c0 - Change to beginning of line
- y$ - Yank to end of line
- ye - Yank to end of word
- yy - Yank line (doubled operator)
Shortcuts
- D - Same as d$ (delete to end of line)
- C - Same as c$ (change to end of line)
Text Objects
Text objects let you operate on semantic units:
Inner Word (iw)
- diw - Delete inner word (word under cursor)
- ciw - Change inner word
- yiw - Yank inner word
Text objects work from anywhere within the word - you don't need to be at the start.
Visual Feedback
- Cursor: Thin blinking cursor in insert mode, solid block in normal mode
- Mode Indicator: Shows current mode and pending commands (e.g., "NORMAL d" when waiting for motion)
Keybind Conflicts
ESC Key
ESC is used for:
- Exiting Vim normal mode (highest priority)
- NOT used for canceling edits (use Ctrl-Q instead)
- NOT used for interrupting streams in Vim mode (use Ctrl-C)
- In non-Vim mode, Esc interrupts streams
Ctrl+C Key (Vim Mode)
In Vim mode, Ctrl+C always interrupts streams (similar to terminal interrupt behavior). This means:
- Standard Ctrl+C copy is not available in Vim mode
- Use vim yank commands (
y,yy,yiw, etc.) to copy text instead - This provides consistent interrupt behavior whether text is selected or not
Tips
-
Learn operators + motions: Instead of memorizing every command, learn the operators (d, c, y) and motions (w, b, $, 0). They combine naturally.
-
Use text objects:
ciwto change a word is more reliable thancwbecause it works from anywhere in the word. -
Column preservation: When navigating up/down, your column position is preserved across lines of different lengths.
Not Yet Implemented
Features that may be added in the future:
- ge - Backward end of word motion
- f{char}, t{char} - Find character motions
- i", i', i(, i[, i{ - More text objects
- 2w, 3dd, 5x - Count prefixes
- Visual mode - Character, line, and block selection
- Macros - Recording and replaying command sequences
- Marks - Named cursor positions
Context Management
Commands for managing conversation history length and token usage.
Comparison
| Approach | /clear | /truncate | /compact | Start Here |
|---|---|---|---|---|
| Speed | Instant | Instant | Slower (uses AI) | Instant |
| Context Preservation | None | Temporal | Intelligent | Intelligent |
| Cost | Free | Free | Uses API tokens | Free |
| Reversible | No | No | No | Yes |
Start Here
Start Here allows you to restart your conversation from a specific point, using that message as the entire conversation history. This is available on:
- Plans - Click "🎯 Start Here" on any plan to use it as your conversation starting point
- Final Assistant messages - Click "🎯 Start Here" on any completed assistant response
This is a form of "opportunistic compaction" - the content is already well-structured, so the operation is instant. You can review the new starting point before the old context is permanently removed, making this the only reversible compaction approach.
/clear - Clear All History
Remove all messages from conversation history.
Syntax
/clear
Notes
- Instant deletion of all messages
- Irreversible - all history is permanently removed
- Use when you want to start a completely new conversation
/compact - AI Summarization
Compress conversation history using AI summarization. Replaces the conversation with a compact summary that preserves context.
Syntax
/compact [-t <tokens>] [-m <model>]
[continue message on subsequent lines]
Options
-t <tokens>- Maximum output tokens for the summary (default: ~2000 words)-m <model>- Model to use for compaction (sticky preference). Supports abbreviations likehaiku,sonnet, or full model strings
Examples
Basic compaction:
/compact
Limit summary size:
/compact -t 5000
Choose compaction model:
/compact -m haiku
Use Haiku for faster, lower-cost compaction. This becomes your default until changed.
Auto-continue with custom message:
/compact
Continue implementing the auth system
After compaction completes, automatically sends "Continue implementing the auth system" as a follow-up message.
Multiline continue message:
/compact
Now let's refactor the middleware to use the new auth context.
Make sure to add tests for the error cases.
Continue messages can span multiple lines for more detailed instructions.
Combine all options:
/compact -m haiku -t 8000
Keep working on the feature
Combine custom model, token limit, and auto-continue message.
Notes
- Model preference persists globally across workspaces
- Uses the specified model (or workspace model by default) to summarize conversation history
- Preserves actionable context and specific details
- Irreversible - original messages are replaced
- Continue message is sent once after compaction completes (not persisted)
/truncate - Simple Truncation
Remove a percentage of messages from conversation history (from the oldest first).
Syntax
/truncate <percentage>
Parameters
percentage(required) - Percentage of messages to remove (0-100)
Examples
/truncate 50
Remove oldest 50% of messages.
Notes
- Simple deletion, no AI involved
- Removes messages from oldest to newest
- About as fast as
/clear /truncate 100is equivalent to/clear- Irreversible - messages are permanently removed
OpenAI Responses API Limitation
⚠️ /truncate does not work with OpenAI models due to the Responses API architecture:
- OpenAI's Responses API stores conversation state server-side
- Manual message deletion via
/truncatedoesn't affect the server-side state - Instead, OpenAI models use automatic truncation (
truncation: "auto") - When context exceeds the limit, the API automatically drops messages from the middle of the conversation
Workarounds for OpenAI:
- Use
/clearto start a fresh conversation - Use
/compactto intelligently summarize and reduce context - Rely on automatic truncation (enabled by default)
Instruction Files
Overview
mux layers instructions from two locations:
~/.mux/AGENTS.md(+ optionalAGENTS.local.md) — global defaults<workspace>/AGENTS.md(+ optionalAGENTS.local.md) — workspace-specific context
Priority within each location: AGENTS.md → AGENT.md → CLAUDE.md (first match wins). If the base file is found, mux also appends AGENTS.local.md from the same directory when present.
Note: mux strips HTML-style markdown comments (
<!-- ... -->) from instruction files before sending them to the model. Use these comments for editor-only metadata—they will not reach the agent.
Scoped Instructions
mux supports Scoped Instructions that activate only in specific contexts. You define them using special headings in your instruction files:
Mode: <mode>— Active only in specific interaction modes (e.g., plan, exec).Model: <regex>— Active only for specific models (e.g., GPT-4, Claude).Tool: <tool_name>— Appended to the description of specific tools.
General Rules
- Precedence: Workspace instructions (
<workspace>/AGENTS.md) are checked first, then global instructions (~/.mux/AGENTS.md). - First Match Wins: Only the first matching section found is used. Overriding global defaults is as simple as defining the same section in your workspace.
- Isolation: These sections are stripped from the general
<custom-instructions>block. Their content is injected only where it belongs (e.g., into a specific tool's description or a special XML tag). - Boundaries: A section's content includes everything until the next heading of the same or higher level.
Mode Prompts
Use mode-specific sections to optimize context and customize behavior for specific workflow stages. The active mode's content is injected via a <mode> tag.
Syntax: Mode: <mode> (case-insensitive)
Example:
# General Instructions

- Be concise

## Mode: Plan

When planning:

- Focus on goals and trade-offs
- Propose alternatives with pros/cons

## Mode: Compact

- Preserve key decisions
- Be extremely concise
Available modes:
- exec (default) — Normal operations.
- plan — Active in Plan Mode.
- compact — Used during
/compactto guide history summarization.
Model Prompts
Scope instructions to specific models or families using regex matching. The matched content is injected via a <model-...> tag.
Syntax: Model: <regex>
- Regexes are case-insensitive by default.
- Use
/pattern/flagsfor custom flags (e.g.,/openai:.*codex/i).
Example:
## Model: sonnet

Be terse and to the point.

## Model: openai:.\*codex

Use status reporting tools every few minutes.
Tool Prompts
Customize how the AI uses specific tools by appending instructions to their descriptions.
Syntax: Tool: <tool_name>
- Tool names must match exactly (case-insensitive).
- Only tools available for the active model are augmented.
Example:
## Tool: bash

- Use `rg` instead of `grep` for file searching

## Tool: file_edit_replace_string

- Run `prettier --write` after editing files

# Tool: status_set

- Set status url to the Pull Request once opened
Available tools: bash, file_read, file_edit_replace_string, file_edit_insert, propose_plan, todo_write, todo_read, status_set, web_search.
Practical layout
~/.mux/
  AGENTS.md          # Global instructions
  AGENTS.local.md    # Personal tweaks (gitignored)

my-project/
  AGENTS.md          # Project instructions (may include "Mode: Plan", etc.)
  AGENTS.local.md    # Personal tweaks (gitignored)
Project Secrets
Securely manage environment variables for your projects in mux. Project secrets are automatically injected when the agent executes bash commands, making it easy to provide API keys, tokens, and other sensitive configuration.
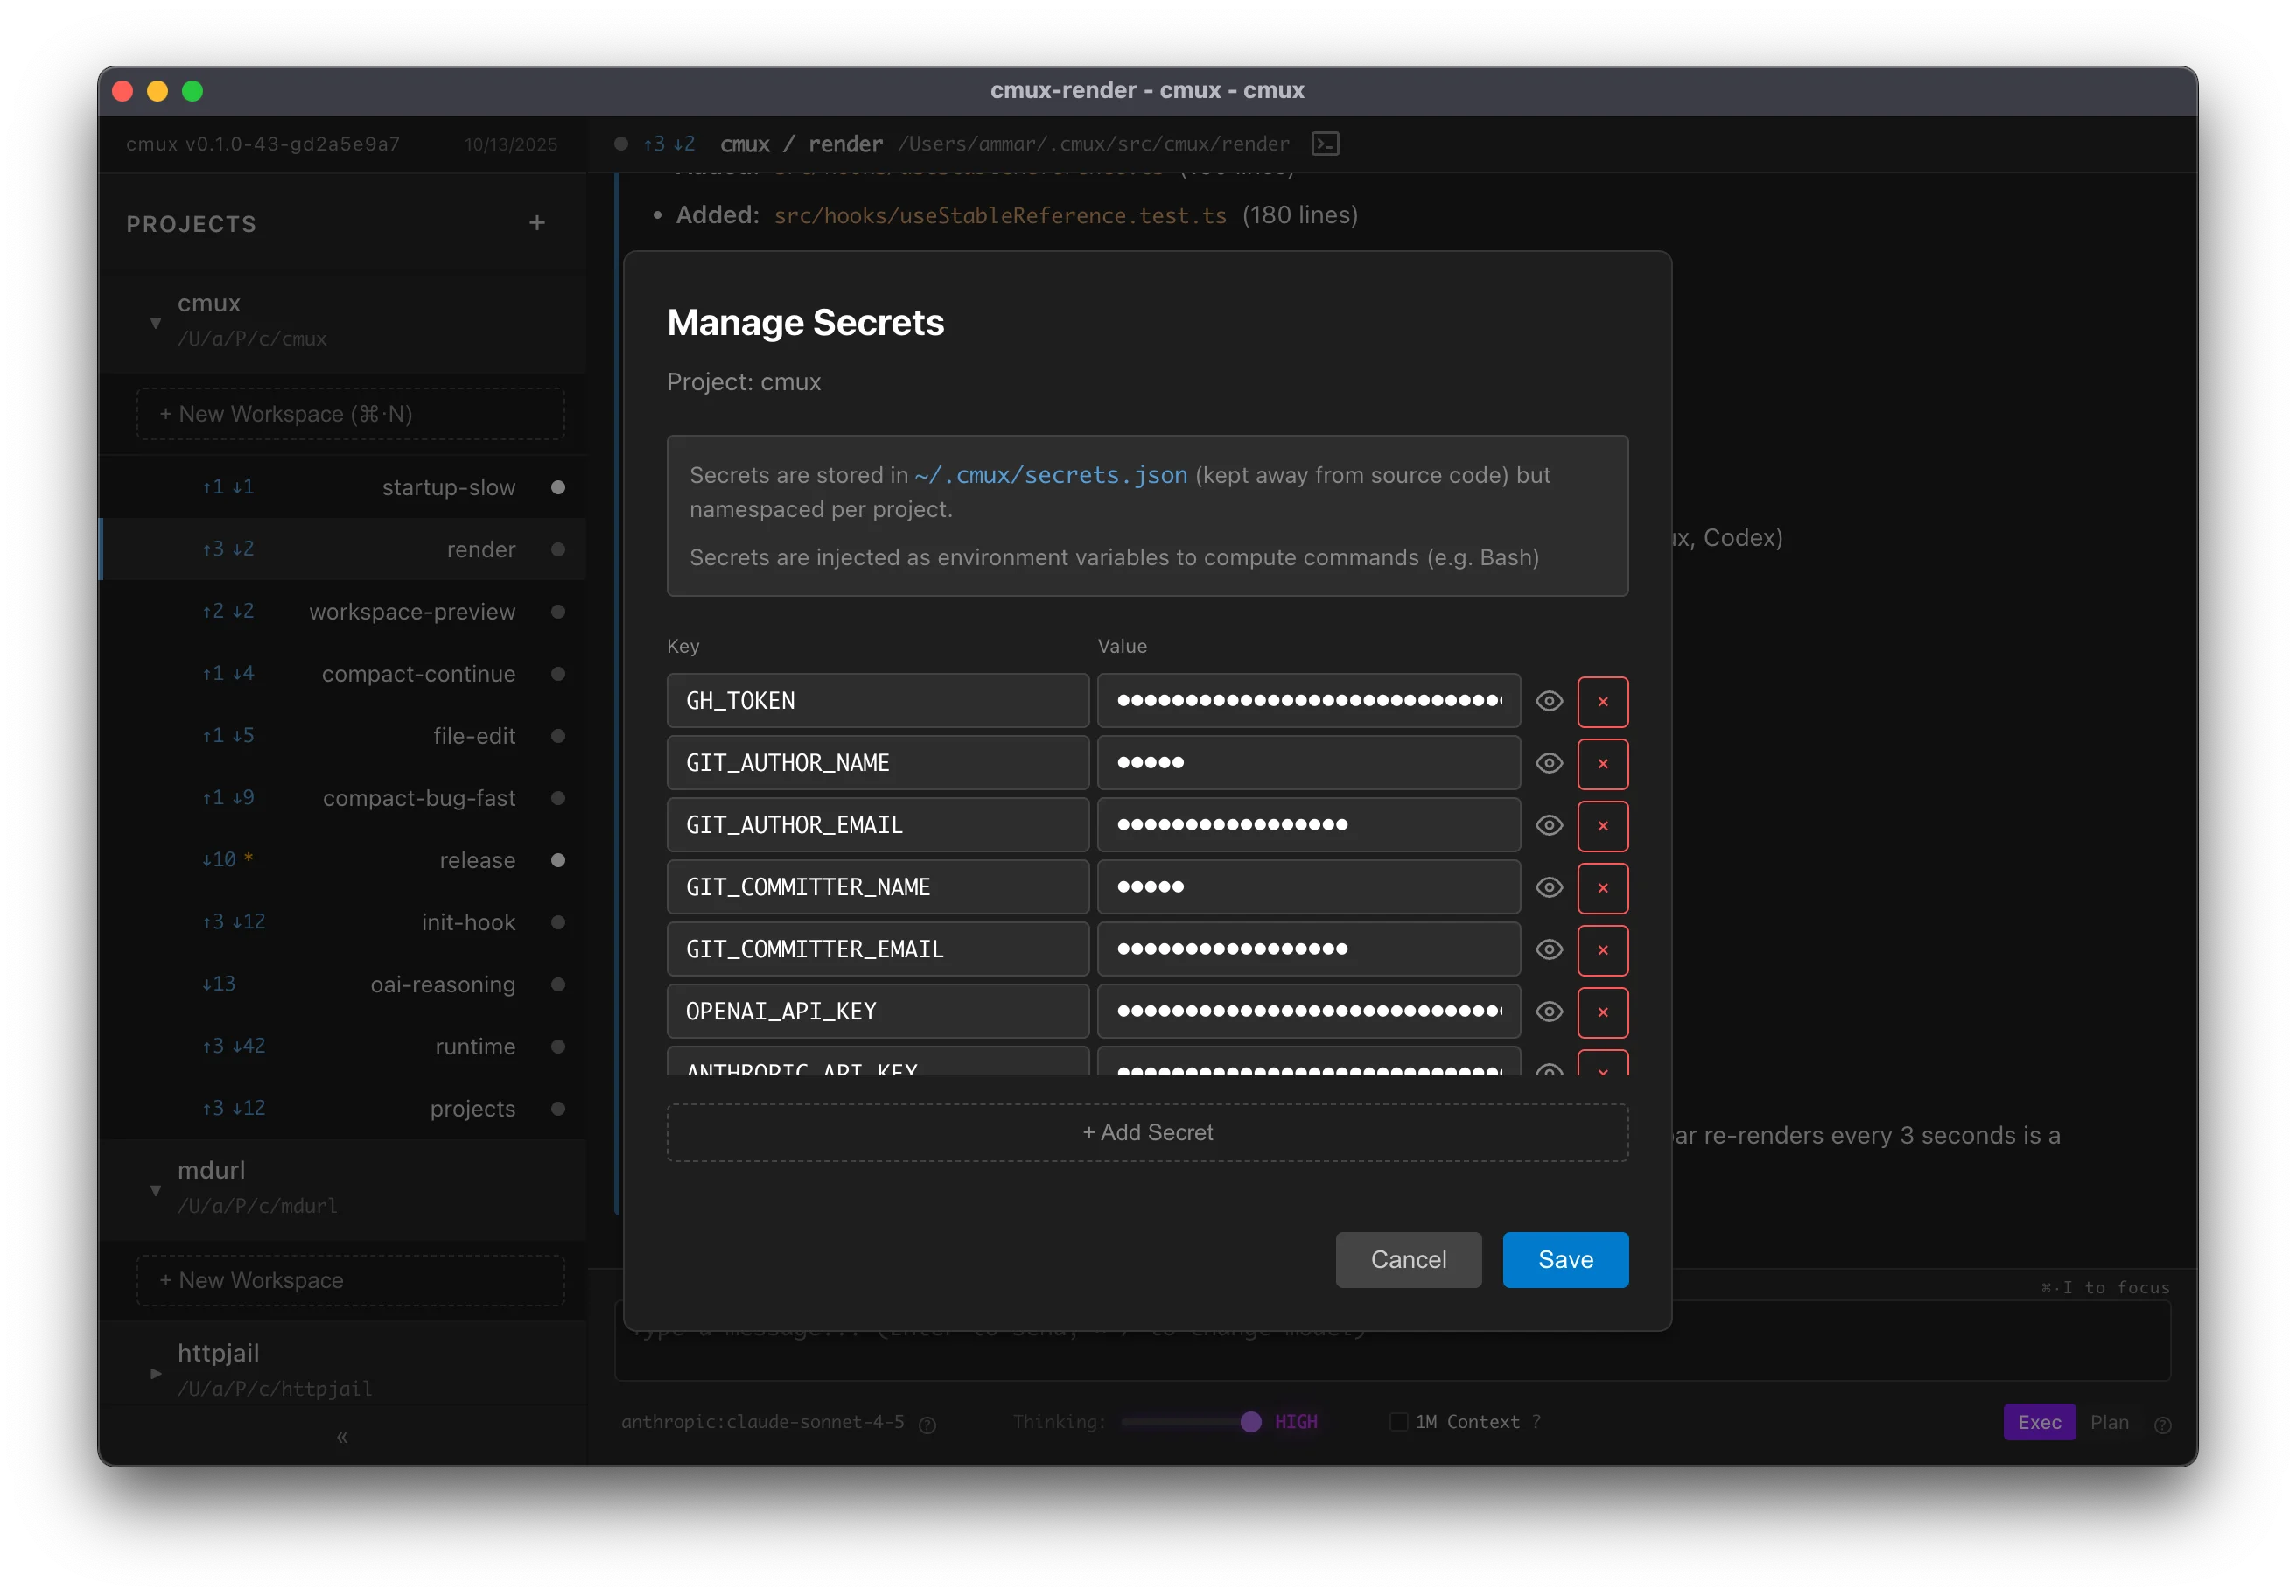
What Are Project Secrets?
Project secrets are key-value pairs stored per project that are:
- Automatically injected as environment variables when running bash commands
- Stored outside repo in
~/.mux/secrets.json - Project-scoped - each project has its own set of secrets
- Workspace-inherited - all workspaces in a project use the same secrets
Common Use Cases
- API Keys:
ANTHROPIC_API_KEY,OPENAI_API_KEY,GITHUB_TOKEN - Authentication tokens:
NPM_TOKEN,DOCKER_HUB_TOKEN - Database credentials:
DATABASE_URL,POSTGRES_PASSWORD - Service endpoints:
API_BASE_URL,WEBHOOK_URL - Build configuration:
BUILD_ENV,FEATURE_FLAGS
Managing Secrets
Opening the Secrets Modal
- Find your project in the left sidebar
- Hover over the project name
- Click the 🔑 key icon that appears
How Secrets Are Used
When the agent runs bash commands (via the bash tool), all project secrets are automatically injected as environment variables:
# If you have a secret: GH_TOKEN=ghp_abc123
# The agent can use it in commands:
gh api /user  # Uses GH_TOKEN from environment
The agent doesn't need to explicitly reference secrets - they're available as regular environment variables in all bash executions within that project's workspaces.
Security Considerations
Storage
- Secrets are stored in
~/.mux/config.json - Stored in plaintext - the config file is not encrypted
- The config file has standard user-only file permissions
Related
- Agentic Git Identity - Configure Git credentials for AI commits using Project Secrets
Agentic Git Identity
Configure mux to use a separate Git identity for AI-generated commits, making it easy to distinguish between human and AI contributions. Reasons to use a separate identity include:
- Clear attribution
- Preventing (accidental) destructive actions
- Enforcing review flow, e.g. preventing AI from merging into
mainwhile allowing humans
Setup Overview
- Create a GitHub account for your agent (e.g.,
username-agent) - Generate a Classic GitHub token
- Configure Git to use the agent identity
- Configure Git credentials to use the token
Step 1: Create Agent GitHub Account
Create a separate GitHub account for your agent:
- Sign up at github.com/signup
- Use a distinctive username (e.g.,
yourname-agent,yourname-ai) - Use a separate email (GitHub allows plus-addressing:
yourname+ai@example.com)
Note: This is optional but recommended. You can also use your main account with a different email/name.
Step 2: Generate Classic GitHub Token
Classic tokens are easier to configure than fine-grained tokens for repository access.
- Log into your agent GitHub account
- Go to Settings → Developer settings → Personal access tokens → Tokens (classic)
- Click "Generate new token (classic)"
- Configure the token:
- Note: "mux agent token" (or similar)
- Expiration: Choose based on your security preferences
- Scopes: Select
repo(Full control of private repositories)
- Click "Generate token"
- Copy the token immediately - you won't see it again
Step 3: Configure Git Identity
Add the Git identity environment variables as Project Secrets in mux:
- Open mux and find your project in the sidebar
- Click the 🔑 key icon to open the secrets modal
- Add the following four secrets:
GIT_AUTHOR_NAME=Your Name (Agent)GIT_AUTHOR_EMAIL=yourname+ai@example.comGIT_COMMITTER_NAME=Your Name (Agent)GIT_COMMITTER_EMAIL=yourname+ai@example.com
- Click "Save"
These environment variables will be automatically injected when the agent runs Git commands in that project.
Note: If you need the agent identity outside of mux, you can alternatively set these as global environment variables in your shell configuration (
~/.zshrc,~/.bashrc, etc.)
Step 4: Configure GitHub Authentication
Install GitHub CLI
If you don't have it:
# macOS
brew install gh

# Windows
winget install --id GitHub.cli

# Linux
# See https://github.com/cli/cli/blob/trunk/docs/install_linux.md
Configure Git Credential Helper
Set up Git to use the GitHub CLI for authentication. The recommended approach is to use gh auth setup-git, which scopes the credential helper to GitHub only:
# Configure gh as credential helper for GitHub (recommended)
gh auth setup-git
This configures Git to use gh for GitHub authentication while preserving your existing credential helpers for other Git hosts.
Alternative: Manual configuration (for advanced users)
If you need more control or want to completely replace existing credential helpers:
# Scope to GitHub only (preserves other credential helpers)
git config --global credential.https://github.com.helper '!gh auth git-credential'

# OR: Replace all credential helpers (may break non-GitHub authentication)
git config --global --unset-all credential.helper
git config --global credential.helper ""
git config --global --add credential.helper '!gh auth git-credential'
⚠️ Warning: The "replace all" approach will disable platform keychain helpers and may break Git authentication for non-GitHub remotes (GitLab, Bitbucket, etc.).
Prompting Tips
Some tips and tricks from the mux developers on getting the most out of your agents.
Persist lessons
When you notice agents make the same class of mistake repeatedly, ask them to modify their AGENTS.md
to prevent the mistake from happening again. We have found this pattern is most effective when:
- You specify the size of the change
- LLMs love fluff — always specify a size constraint like "change at most two sentences"
- Ask the agent to focus on the general lesson, not the specific mistake
Codebases often have "watering hole" type files that are read in the course of
certain types of changes. For example, you may have a central file defining an API interface. When
the lesson is only relevant to a particular type of change it's often better to persist lessons as
source comments in such files vs. expanding the global AGENTS.md.
Define the loop
Agents thrive on TDD. Try to define their task in terms of what checks need to pass before they can claim success.
For mux development, we have a wait_pr_checks.sh script
that polls GitHub and ensures that:
- There are no dirty changes
- All checks pass
- All review comments are resolved
- There are no merge conflicts
Create a similar script for your project and try asking your agent to work persistently until it passes.
Aggressively prune context
Even though Sonnet 4.5 has up to 1M in potential context, we experience a noticeable improvement in
quality when kept <100k tokens. We suggest running /compact with a continue message
often to keep context small. For example:
/compact
<what you want next>
This will automatically send a follow-up message after compaction to keep the session flowing.
Keeping code clean
Some prompts that help you keep the codebase clean:
Elevate the fix to design level:
- We keep seeing this class of bug in component X, fix this at a design level
- There's bug X, provide a fix that solves the whole class of bugs
At the end of a long session before compaction, try asking:
- How can the code/architecture be improved to make similar changes easier?
- What notes in AGENTS.md would make this change easier for future Assistants?
At end of long session (ideally after compaction), try asking:
- DRY your work
- Strive for net LoC reduction
- Review in depth, simplify
System Prompt
mux is interested in supporting a variety of models at different levels of performance.
To that end, we're built on the Vercel AI SDK which does most of the heavy lifting in creating a unified API for all models.
Even with consistent support at the protocol layer, we have found that different models react very differently to the same set of tools and instructions. So, we strive to minimize the system prompt and let users figure out the prompting trade-offs.
Here's a snippet from src/services/systemMessage.ts which is our shared system prompt (minus tools).
// The PRELUDE is intentionally minimal to not conflict with the user's instructions.
// mux is designed to be model agnostic, and models have shown large inconsistency in how they
// follow instructions.
const PRELUDE = `
<prelude>
You are a coding agent.

<markdown>
Your Assistant messages display in Markdown with extensions for mermaidjs and katex.

When creating mermaid diagrams:
- Avoid side-by-side subgraphs (they display too wide)
- For comparisons, use separate diagram blocks or single graph with visual separation
- When using custom fill colors, include contrasting color property (e.g., "style note fill:#ff6b6b,color:#fff")
- Make good use of visual space: e.g. use inline commentary
- Wrap node labels containing brackets or special characters in quotes (e.g., Display["Message[]"] not Display[Message[]])

Use GitHub-style \`<details>/<summary>\` tags to create collapsible sections for lengthy content, error traces, or supplementary information. Toggles help keep responses scannable while preserving detail.
</markdown>
</prelude>
`;

function buildEnvironmentContext(runtime: Runtime, workspacePath: string): string {
  const isWorktree = runtime instanceof LocalRuntime;

  if (isWorktree) {
    return `
<environment>
You are in a git worktree at ${workspacePath}

- This IS a git repository - run git commands directly (no cd needed)
- Tools run here automatically
- Do not modify or visit other worktrees (especially the main project) without explicit user intent
- You are meant to do your work isolated from the user and other agents
</environment>
`;
  } else {
    return `
<environment>
You are in a git repository at ${workspacePath}

- This IS a git repository - run git commands directly (no cd needed)
- Tools run here automatically
- You are meant to do your work isolated from the user and other agents
</environment>
`;
  }
}
Telemetry
mux collects anonymous usage telemetry to help us understand how the product is being used and improve it over time.
Privacy Policy
- Opt-out by default: You can disable telemetry at any time
- No personal information: We never collect usernames, project names, file paths, or code content
- Random IDs only: Only randomly-generated workspace IDs are sent (impossible to trace back to you)
- No hashing: We don't hash sensitive data because hashing is vulnerable to rainbow table attacks
- Transparent data: See exactly what data structures we send in
src/telemetry/payload.ts
What We Track
All telemetry events include basic system information:
- Application version
- Operating system platform (darwin, win32, linux)
- Electron version
Specific Events
- App Started: When the app launches (includes first-launch flag)
- Workspace Creation: When a new workspace is created (workspace ID only)
- Workspace Switching: When you switch between workspaces (workspace IDs only)
- Message Sending: When messages are sent (model, mode, message length rounded to base-2)
- Errors: Error types and context (no sensitive data)
What We DON'T Track
- Your messages or code
- Project names or file paths
- API keys or credentials
- Usernames or email addresses
- Any personally identifiable information
Disabling Telemetry
You can disable telemetry at any time using the /telemetry slash command:
/telemetry off
To re-enable it:
/telemetry on
Your preference is saved and persists across app restarts.
Source Code
For complete transparency, you can review the telemetry implementation:
- Payload definitions:
src/telemetry/payload.ts- All data structures we send - Client code:
src/telemetry/client.ts- How telemetry is sent - Privacy utilities:
src/telemetry/utils.ts- Base-2 rounding and helpers
The telemetry system includes debug logging that you can see in the developer console (View → Toggle Developer Tools).
Storybook
Storybook is a tool for developing and testing UI components in isolation. It provides a sandboxed environment where you can build, view, and test components without running the full Electron application.
Starting Storybook
make storybook
# or
bun run storybook
This will start the Storybook development server at http://localhost:6006.
Building Static Storybook
To build a static version of Storybook that can be deployed:
make storybook-build
# or
bun run storybook:build
The output will be in storybook-static/.
Writing Stories
Stories are colocated with their components. For example, ErrorMessage.tsx has its stories in ErrorMessage.stories.tsx in the same directory.
Basic Story Structure
import type { Meta, StoryObj } from "@storybook/react";
import { MyComponent } from "./MyComponent";

const meta = {
  title: "Components/MyComponent",
  component: MyComponent,
  parameters: {
    layout: "centered", // or "fullscreen" or "padded"
  },
  tags: ["autodocs"], // Enables automatic documentation
} satisfies Meta<typeof MyComponent>;

export default meta;
type Story = StoryObj<typeof meta>;

export const Default: Story = {
  args: {
    prop1: "value1",
    prop2: "value2",
  },
};

export const Variant: Story = {
  args: {
    prop1: "different value",
    prop2: "another value",
  },
};
Component Examples
See the existing stories for reference:
src/components/ErrorMessage.stories.tsx- Simple component with multiple statessrc/components/Modal.stories.tsx- Complex component with children and multiple variants
Global Styles
Storybook automatically applies the same global styles as the main app:
- Color variables (
GlobalColors) - Font definitions (
GlobalFonts) - Scrollbar styles (
GlobalScrollbars)
These are configured in .storybook/preview.tsx.
Handling Electron APIs
Some components depend on window.api for Electron IPC communication. For these components:
- Preferred: Extract the component logic to accept props instead of calling IPC directly
- Alternative: Mock the
window.apiobject in.storybook/preview.tsx
Example mock structure:
window.api = {
  workspace: {
    create: async () => ({ success: true, metadata: { ... } }),
    list: async () => ({ success: true, workspaces: [...] }),
    // ...
  },
  // ... other IPC channels
};
Benefits
- Isolated Development: Build components without running the full Electron app
- Visual Testing: See all component states at once
- Documentation: Stories serve as living documentation with
autodocs - Faster Iteration: Hot reload is faster than Electron rebuilds
- Accessibility: Storybook addons can check accessibility issues
Configuration
.storybook/main.ts- Main Storybook configuration.storybook/preview.tsx- Global decorators and parameterstsconfig.json- Includes.storybook/**/*.tsfor type checking
Tips
- Keep stories simple and focused on visual states
- Use Storybook's Controls addon to make props interactive
- Add multiple stories for different states (loading, error, success, etc.)
- Use the
tags: ["autodocs"]option to generate automatic documentation
Terminal Benchmarking
mux ships with a headless adapter for Terminal-Bench. The adapter runs the Electron backend without opening a window and exercises it through the same IPC paths we use in integration tests. This page documents how to launch benchmarks from the repository tree.
Prerequisites
- Docker must be installed and running. Terminal-Bench executes each task inside a dedicated Docker container.
uvis available in the nixdevShell(provided viaflake.nix), or install it manually from https://docs.astral.sh/uv/.- Standard provider API keys (e.g.
ANTHROPIC_API_KEY,OPENAI_API_KEY) should be exported so mux can stream responses.
Optional environment overrides:
| Variable | Purpose | Default |
|---|---|---|
MUX_AGENT_REPO_ROOT | Path copied into each task container | repo root inferred from the agent file |
MUX_TRUNK | Branch checked out when preparing the project | main |
MUX_WORKSPACE_ID | Workspace identifier used inside mux | mux-bench |
MUX_MODEL | Preferred model (supports provider/model syntax) | anthropic/claude-sonnet-4-5 |
MUX_THINKING_LEVEL | Optional reasoning level (off, low, medium, high) | high |
MUX_MODE | Starting mode (plan or exec) | exec |
MUX_TIMEOUT_MS | Optional stream timeout in milliseconds | no timeout |
MUX_CONFIG_ROOT | Location for mux session data inside the container | /root/.mux |
MUX_APP_ROOT | Path where the mux sources are staged | /opt/mux-app |
MUX_PROJECT_PATH | Explicit project directory inside the task container | auto-detected from common paths |
Running Terminal-Bench
All commands below should be run from the repository root.
Quick smoke test (single task)
uvx terminal-bench run \
  --dataset terminal-bench-core==0.1.1 \
  --agent-import-path benchmarks.terminal_bench.mux_agent:MuxAgent \
  --n-tasks 1
This downloads the Terminal-Bench runner, copies the mux sources into the container, and validates the adapter against the first task only. Use this before attempting a full sweep.
Full dataset
uvx terminal-bench run \
  --dataset terminal-bench-core==0.1.1 \
  --agent-import-path benchmarks.terminal_bench.mux_agent:MuxAgent
Results (pass/fail, token usage, wall-clock) are printed at the end of the run. Terminal-Bench also writes per-task logs under the current working directory; review them when diagnosing failures.
You can also use make:
TB_CONCURRENCY=6 TB_LIVESTREAM=1 \
make benchmark-terminal TB_ARGS="--n-tasks 3 --model anthropic/claude-sonnet-4-20250514 --agent-kwarg mode=plan --agent-kwarg thinking_level=medium"
TB_DATASET defaults to terminal-bench-core==0.1.1, but can be overridden (e.g. make benchmark-terminal TB_DATASET=terminal-bench-core==head).
Use --agent-kwarg mode=plan to exercise the plan/execute workflow—the CLI will gather a plan first, then automatically approve it and switch to execution. Leaving the flag off (or setting mode=exec) skips the planning phase.
Use TB_CONCURRENCY=<n> to control --n-concurrent (number of concurrently running tasks) and TB_LIVESTREAM=1 to stream log output live instead of waiting for the run to finish. These map to Terminal-Bench’s --n-concurrent and --livestream flags.
How the Adapter Works
The adapter lives in benchmarks/terminal_bench/mux_agent.py. For each task it:
- Copies the mux repository (package manifests +
src/) into/tmp/mux-appinside the container. - Ensures Bun exists, then runs
bun install --frozen-lockfile. - Launches
src/cli/debug/agentSessionCli.tsto prepare workspace metadata and stream the instruction, storing state underMUX_CONFIG_ROOT(default/root/.mux).
MUX_MODEL accepts either the mux colon form (anthropic:claude-sonnet-4-5) or the Terminal-Bench slash form (anthropic/claude-sonnet-4-5); the adapter normalises whichever you provide.
Troubleshooting
command not found: bun– ensure the container can reach Bun’s install script, or pre-install Bun in your base image. The adapter aborts if the install step fails.- Workspace creation errors – set
MUX_PROJECT_PATHto the project directory inside the task container if auto-discovery misses it. - Streaming timeouts – pass
--n-tasks 1while iterating on fixes, or setMUX_TIMEOUT_MS=180000to reinstate a timeout if needed.
AGENT INSTRUCTIONS
Prime directive: keep edits minimal and token-efficient—say only what conveys actionable signal.
Project Snapshot
mux: Electron + React desktop app for parallel agent workflows; UX must be fast, responsive, predictable.- Minor breaking changes are expected, but critical flows must allow upgrade↔downgrade without friction; skip migrations when breakage is tightly scoped.
- Public work (issues/PRs/commits) must use 🤖 in the title and include "Generated with
mux" in the body when applicable.
PR + Release Workflow
- Reuse existing PRs; never close or recreate without instruction. Force-push updates.
- After every push run:
gh pr view <number> --json mergeable,mergeStateStatus | jq '.'
./scripts/wait_pr_checks.sh <pr_number>
- Generally run
wait_pr_checksafter submitting a PR to ensure CI passes. - Status decoding:
mergeable=MERGEABLEclean;CONFLICTINGneeds resolution.mergeStateStatus=CLEANready,BLOCKEDwaiting for CI,BEHINDrebase,DIRTYconflicts. - If behind:
git fetch origin && git rebase origin/main && git push --force-with-lease. - Never enable auto-merge or merge at all unless the user explicitly says "merge it".
- Do not enable auto-squash or auto-merge on Pull Requests unless explicit permission is given.
- PR descriptions: include only information a busy reviewer cannot infer; focus on implementation nuances or validation steps.
- Title prefixes:
perf|refactor|fix|feat|ci|bench, e.g.,🤖 fix: handle workspace rename edge cases.
Repo Reference
- Core files:
src/main.ts,src/preload.ts,src/App.tsx,src/config.ts. - Persistent data:
~/.mux/config.json,~/.mux/src/<project>/<branch>(worktrees),~/.mux/sessions/<workspace>/chat.jsonl.
Documentation Rules
- No free-floating Markdown. User docs live in
docs/(readdocs/README.md, updatedocs/SUMMARY.md, use standard Markdown + mermaid). Developer/test notes belong inline as comments. - For planning artifacts, use the
propose_plantool or inline comments instead of ad-hoc docs. - Do not add new root-level docs without explicit request; during feature work rely on code + tests + inline comments.
- Test documentation stays inside the relevant test file as commentary explaining setup/edge cases.
- External API docs already live inside
/tmp/ai-sdk-docs/**.mdx; never browsehttps://sdk.vercel.ai/docs/ai-sdk-coredirectly.
Key Features & Performance
- Core UX: projects sidebar (left panel), workspace management (local git worktrees or SSH clones), config stored in
~/.mux/config.json. - Fetch bulk data in one IPC call—no O(n) frontend→backend loops.
Tooling & Commands
- Package manager: bun only. Use
bun install,bun add,bun run(which proxies to Make when relevant). Runbun installif modules/types go missing. - Makefile is source of truth (new commands land there, not
package.json). - Primary targets:
make dev|start|build|lint|lint-fix|fmt|fmt-check|typecheck|test|test-integration|clean|help.
Refactoring & Runtime Etiquette
- Use
git mvto retain history when moving files. - Never kill the running mux process; rely on
make test/make typecheckfor validation.
Testing Doctrine
Two types of tests are preferred:
- True integration tests — use real runtimes, real filesystems, real network calls. No mocks, stubs, or fakes. These prove the system works end-to-end.
- Unit tests on pure/isolated logic — test pure functions or well-isolated modules where inputs and outputs are clear. No mocks needed because the code has no external dependencies.
Avoid mock-heavy tests that verify implementation details rather than behavior. If you need mocks to test something, consider whether the code should be restructured to be more testable.
Storybook
- Prefer full-app stories (
App.stories.tsx) to isolated components.
TDD Expectations
- When asked for TDD, write real repo tests (no
/tmpscripts) and commit them. - Pull complex logic into easily tested utils. Target broad coverage with minimal cases that prove the feature matters.
General Rules
- Always run
make typecheckafter changes (covers main + renderer). - Place unit tests beside implementation (
*.test.ts). Reservetests/for heavy integration/E2E cases. - Run unit suites with
bun test path/to/file.test.ts. - Skip tautological tests (simple mappings, identical copies of implementation); focus on invariants and boundary failures.
- Keep utils pure or parameterize external effects for easier testing.
Integration Testing
- Use
bun x jest(optionallyTEST_INTEGRATION=1). Examples:TEST_INTEGRATION=1 bun x jest tests/ipcMain/sendMessage.test.ts -t "pattern"TEST_INTEGRATION=1 bun x jest tests
tests/ipcMainis slow; filter with-twhen possible. Tests usetest.concurrent().- Never bypass IPC: do not call
env.config.saveConfig,env.historyService, etc., directly. Useenv.mockIpcRenderer.invoke(IPC_CHANNELS.CONFIG_SAVE|HISTORY_GET|WORKSPACE_CREATE, ...)instead. - Acceptable exceptions: reading config to craft IPC args, verifying filesystem after IPC completes, or loading existing data to avoid redundant API calls.
Command Palette & UI Access
- Open palette with
Cmd+Shift+P(mac) /Ctrl+Shift+P(win/linux); quick toggle viaCmd+P/Ctrl+P. - Palette covers workspace mgmt, navigation, chat utils, mode/model switches, slash commands (
/for suggestions,>for actions).
Styling
- Colors defined in
src/styles/colors.tsx; fonts insrc/styles/fonts.tsx. Reference them via CSS variables (e.g.,var(--color-plan-mode)), never hardcode values.
TypeScript Discipline
- Ban
as any; rely on discriminated unions, type guards, or authored interfaces. - Use
Record<Enum, Value>for exhaustive mappings to catch missing cases. - Apply utility types (
Omit,Pick, etc.) to build UI-specific variants of backend types, preventing unnecessary re-renders and clarifying intent. - Let types drive design: prefer discriminated unions for state, minimize runtime checks, and simplify when types feel unwieldy.
- Use
usingdeclarations (or equivalent disposables) for processes, file handles, etc., to ensure cleanup even on errors. - Centralize magic constants under
src/constants/; share them instead of duplicating values across layers.
Component State & Storage
- Parent components own localStorage interactions; children announce intent only.
- Use
usePersistedState/readPersistedState/updatePersistedStatehelpers—never calllocalStoragedirectly. - Avoid destructuring props in function signatures; access via
props.fieldto keep rename-friendly code.
Module Imports
- Use static
importstatements at the top; resolve circular dependencies by extracting shared modules, inverting dependencies, or using DI. Dynamicawait import()is not an acceptable workaround.
Workspace Identity
- Frontend must never synthesize workspace IDs (e.g.,
${project}-${branch}is forbidden). Backend operations that change IDs must return the value; always consume that response.
IPC Type Boundary
- IPC methods return backend types (
WorkspaceMetadata, etc.), not ad-hoc objects. - Frontend may extend backend types with UI context (projectPath, branch, etc.).
- Frontend constructs UI shapes from backend responses plus existing context (e.g., recommended trunk branch).
- Never duplicate type definitions around the boundary—import shared types instead.
Why: single source of truth, clean separation, automatic propagation of backend changes, and no duplicate schemas.
Debugging & Diagnostics
bun run debug ui-messages --workspace <name>to inspect messages; add--drop <n>to skip recent entries. Workspace names live in~/.mux/sessions/.
UX Guardrails
- Do not add UX flourishes (auto-dismiss, animations, tooltips, etc.) unless requested. Ship the simplest behavior that meets requirements.
- Enforce DRY: if you repeat code/strings, factor a shared helper/constant (search first; if cross-layer, move to
src/constants/orsrc/types/). - Hooks that detect a condition should handle it directly when they already have the data—avoid unnecessary callback hop chains.
- Every operation must have a keyboard shortcut, and UI controls with shortcuts should surface them in hover tooltips.
Logging
- Use the
loghelper (log.debugfor noisy output) for backend logging.
Bug-Fixing Mindset
- Prefer fixes that simplify existing code; such simplifications often do not need new tests.
- When adding complexity, add or extend tests. If coverage requires new infrastructure, propose the harness and then add the tests there.
Mode: Exec
- Treat as a standing order: keep running checks and addressing failures until they pass or a blocker outside your control arises.
- Before pushing to a PR, run
make static-checklocally and ensure all checks pass. Fix issues withmake fmtor manual edits. Never push until local checks are green. - Reproduce remote static-check failures locally with
make static-check; fix formatting withmake fmtbefore rerunning CI. - When CI fails, reproduce locally with the smallest relevant command; log approximate runtimes to optimize future loops.
Mode: Plan
- When Plan Mode is requested, assume the user wants the actual completed plan; do not merely describe how you would devise one.
- Attach a net LoC estimate (product code only) to each recommended approach.
Tool: status_set
- Set status url to the Pull Request once opened